Arlington EMS System Protocols
- Medical
- Allergic Reaction - REACTION Format
- Hypoglycemia - Maryland Format
- Diabetic Emergency
- Cardiac Arrest - NC Format
- Pain Management - James Format
- Epistaxis
- Abuse / Neglect
- Adult Trauma
- Procedures
Medical
Allergic Reaction - REACTION Format
This policy applies to: Patients whose chief complaint is itching, rash or allergic reaction.
Exclusion Criteria: None
Recognize
- Itching, hives, flushing, angioedema
- Coughing, wheezing, stridor, or respiratory distress
- Chest or throat constriction
- Difficulty swallowing
- Difficulty phonating
- Nausea / vomiting
- Altered Mental Status
- Hypotension or shock
- Edema
Evaluate
- Onset and trajectory of symptoms
- Anatomic and situational location of exposure
- Insect sting or bite
- Known allergies: food, environmental, medication, other
- Known or suspected exposure: past occurrences and current event
- Known history of sensitivity or allergic reaction
- Past medical and medication history
- New clothing, soap, or detergent
- New medications
Administer Treatment
- Remove allergy trigger if known and present
- Prioritize interventions based on clinical presentation and severity of reaction
- Supplemental oxygen PRN for goal SpO2
- Attentive and prompt airway assessment and management
- Airway Management if indicated per Airway Management PCG (P1)
- If patient has suspected or known exposure and exhibits signs of any: respiratory distress, airway
restriction, altered mental status or shock, treat accordingly-
- Epinephrine Auto-Injector 0.3 mg IM if available
- Vascular access per Vascular Access PCG
- Consider crystalloid fluid bolus 500 mL IV/IO to support hemodynamics, repeat PRN
- Diphenhydramine (Benadryl) 50 mg IM/IV/IO
- Epinephrine (1mg/1mL) 0.3 mg IM or Epinephrine (1mg/10mL) 0.1 mg IV/IO q 3 min PRN for
MORE SEVERE REACTION-
- Consider Epinephrine infusion 0.01 mcg/kg/min IV/IO, titrate to max 0.1 mcg/kg/min
as an alternative to repeat IM or IV/IO doses - Monitor ECG rhythm closely, Epinephrine may potentiate arrhythmias, especially in
patients over the age of 40
- Consider Epinephrine infusion 0.01 mcg/kg/min IV/IO, titrate to max 0.1 mcg/kg/min
-
- Methylprednisolone (Solu-Medrol) 125 mg IV/IO
- Albuterol (2.5 mg/3 mL) nebulized for wheezing or shortness of breath
-
Consider Differentials
- Urticaria (rash only)
- Anaphylaxis (severe systemic effect)
- Shock (severe vascular effect)
- Angioedema (drug induced or infection)
- Aspiration / airway obstruction
- Vasovagal event
- Asthma or COPD
- Infection (ex: retropharyngeal abscess, bacterial tracheitis, croup, epiglottitis, strep)
- Pulmonary edema or CHF
- Metabolic disorders
Transport Considerations
- During transport, maintain astute airway, breathing, circulation and mental status assessment with
prompt intervention as needed. Stability can quickly change to instability in these patients. - Consider early airway management, reference Airway Management PCG (P1)
Information
- Typically, the shorter the interval from exposure to symptoms, the more severe the reaction
- Hemodynamic instability may recur up to 24 hours after initial stabilization
Other Populations
- Neonatal/ Pediatric drug dosing:
-
- Pediatric Epinephrine Auto-Injector JR dose is 0.15 mg for patients 15-30 Kg
- Diphenhydramine (Benadryl) 1 mg/Kg IM/IV/IO over 5 min max dose 50 mg
- Epinephrine (1mg/1mL) 0.01 mg/Kg IM/IV/IO q3 min until stable or infusion started
-
- Max 0.5 mg per dose (Intentionally larger than adult dosing)
- Epinephrine infusion 0.01 mcg/Kg/min IV/IO, titrate to max 1 mcg/kg/min
-
- Methylprednisolone (Solu-Medrol) 2 mg/Kg IV/IO max dose 125mg
- Albuterol for 15 Kg or more, use adult dose
- Albuterol for less than 15 Kg (1.25mg/ 3ml) nebulized with O2 at 6 lpm
-
Navigate

References
Campbell, Ronna. “Anaphylaxis: Emergency Treatment.” UpToDate, January 2022.
Sicherer, Scott. “Prescribing Epinephrine for Anaphylaxis Self-Treatment.” UpToDate, January 2022.
“U.S. Army Medevac Critical Care Flight Paramedic Standard Medical Operating Guidelines.” Jan. 2020.
Hypoglycemia - Maryland Format
Applies to: Blood glucose less than 70 mg/dL or greater than 300 mg/dL
- Patient-reported low or high blood glucose
- Diabetic patients with other medical symptoms (e.g., vomiting)
- Altered mental status
- Alcohol intoxication, suspected
- Seizure
- Stroke symptoms
- Unresponsive patients
- Cardiac arrest
BLS
- Check blood glucose level
- If blood glucose is less than 70 mg/dL, administer 10-15 grams of oral glucose between the patient’s gum and cheek.
- Administer additional dose of 10-15 grams of oral glucose if not improved after 10 minutes.
ALS
- HYPOglycemia: If blood glucose is less than 70 mg/dL, administer 10% dextrose in 50 mL (5 gram) boluses, 1 minute apart, to a maximum of 250 mL OR 25 grams of 50% dextrose IVP, until:
- the patient has a return to normal mental status, and
- the patient’s blood glucose is at least 90 mg/dL
- If patient has persistently altered mental status and blood glucose less than 90 mg/dL despite treatment, repeat dosing regimen above.
- If unable to initiate an IV and blood glucose is less than 70 mg/dL, administer glucagon 1 mg IM/IN.
- If the patient has persistently altered mental status and blood glucose less than 90
mg/dL at 15 minutes, transport to the hospital should not be delayed.
- If the patient has persistently altered mental status and blood glucose less than 90
- HYPERglycemia: If blood glucose is greater than 300 mg/dL, administer 10 mL/kg Lactated Ringer’s bolus unless rales, wheezing, pedal edema, or history of renal failure or CHF is present.
MC
- Not Applicable
Diabetic Emergency
Applies to: Blood glucose less than 70 mg/dL or greater than 300 mg/dL and
- Patient-reported low or high blood glucose
- Diabetic patients with other medical symptoms (e.g., vomiting)
- Altered mental status
- Alcohol intoxication, suspected
- Seizure
- Stroke symptoms
- Unresponsive patients
- Cardiac arrest
Exclusion Criteria: None
History
- Past medical history
- Medications
- Drug allergies
- Last Meal
- Last BGA check
Signs and Symptoms
- Altered mental status
- Combative / irritable
- Diaphoresis
- Seizures
- Abdominal pain
- Nausea / vomiting
- Weakness
- Dehydration
- Deep / rapid breathing
Differentials
- Alcohol / drug use
- Toxic ingestion
- Trauma; head injury
- Seizure
- CVA
- Altered baseline mental status
Pearls
- Patient’s refusing transport to medical facility after treatment of hypoglycemia:
- Blood sugar must be ≥ 80, patient has ability to eat and availability of food with responders on scene.
- Patient must have known history of diabetes and not taking any oral diabetic agents.
- Patient returns to normal mental status and has a normal neurological exam with no new neurological deficits.
- Must demonstrate capacity to make informed health care decisions. See Universal Patient Care Protocol UP-1.
Otherwise contact medical control.
- Hypoglycemia with Oral Agents:
- Patient’s taking oral diabetic medications should be encouraged to allow transportation to a medical facility.
They are at risk of recurrent hypoglycemia that can be delayed for hours and require close monitoring even after
normal blood glucose is established. - Not all oral agents have prolonged action so Contact Medical Control or NC Poison Control Center for advice.
Patient’s who meet criteria to refuse care should be instructed to contact their physician immediately and
consume a meal.
- Patient’s taking oral diabetic medications should be encouraged to allow transportation to a medical facility.
- Hypoglycemia with Insulin Agents
- Many forms of insulin now exist. Longer acting insulin places the patient at risk of recurrent hypoglycemia even
after a normal blood glucose is established. - Not all insulins have prolonged action so Contact Medical Control for advice.
- Patient’s who meet criteria to refuse care should be instructed to contact their physician immediately and
consume a meal.
- Many forms of insulin now exist. Longer acting insulin places the patient at risk of recurrent hypoglycemia even
- Congestive Heart Failure patients who have Blood Glucose > 250:
- Limit fluid boluses unless patient has signs of volume depletion such as, dehydration, poor perfusion,
hypotension, and/ or shock.
- Limit fluid boluses unless patient has signs of volume depletion such as, dehydration, poor perfusion,
- In extreme circumstances with no IV / IO access and no response to glucagon, D50 can be administered rectally,
Contact Medical Control for advice.
Navigate

References
Protocols
Pharmacology
- Dextrose 10%
- Dextrose 50%
- Glucagon
- Glucose
Procedures
- Vascular Access
Cardiac Arrest - NC Format

Protocols Referenced
Medications Referenced
Naloxone
Procedures Referenced
Pain Management - James Format
Applies to: Patient presents with a painful condition that would benefit from treatment with an analgesic. This
includes DNR/MOLST patients and patients being pre-medicated for a painful procedure.
Exclusion Criteria: Medication specific hypersensitivity/allergy. Active Labor.
History
- Age
- Location
- Duration
- Severity (1 - 10)
- If child use Wong-Baker faces scale
- Past medical history
- Medications
- Drug allergies
Signs and Symptoms
- Severity (Pain scale)
- Quality
- Radiation
- Relation to movement
- Respirations
- Reproducible
- Increased upon palpation
Differentials
- Per the specific protocol
- Musculoskeletal
- Visceral (abdominal)
- Cardiac
- Pleural/ Respiratory
- Neurogenic
- Renal (colic)
Pearls
- Do not administer Acetaminophen to patients with history of liver disease or known to have consumed large amounts of ETOH.
- Fentanyl, Morphine and Ketamine should be reserved for acute pain.
- For patients in Moderate pain for instance, you may use the combination of an oral medication and parenteral if no contraindications are present.
- Ketamine
- May use Ketamine in combination with opioids to limit total amount of opioid administration
- Avoid in patients who have cardiac disease or uncontrolled hypertension.
- Avoid in patients with increased intraocular pressure such as glaucoma.
- Avoid use in combination with benzodiazepines due to depressed respiratory drive
Navigate

References
Protocols
- Nausea / Vomiting
Pharmacology
- Fentanyl
- Morphine
- Ketamine
- Acetaminophen
- Ofirmev
- Ibuprofen
Procedures
- Vascular Access
- Pain Assessment
Epistaxis
This policy applies to: Patients whose chief complaint is severe or prolonged bleeding from the nose.
Exclusion Criteria: Patients with respiratory compromise may first require airway control and mechanical ventilation. Patients with hemodynamic compromise may first require volume and blood product resuscitation.
Recognize
- Severity of Bleeding
- Airway patency
- Distress or Anxiety
- Blood Thinners / Coagulopathies
- Hemodynamic status
- Facial trauma
- Environmental factors
Evaluate
- Medical History and Medications
- Airway patency
- Circulatory status
- Bleeding disorders
- Estimate Blood Loss
- Pain
Administer Treatment
- Patient positioning
- Place patient in an upright sitting position with a forward lean to prevent ingestion or aspiration of blood.
- Apply direct pressure to the soft part of the nose.
- Provide oral suctioning as needed.
- Manage hypovolemia / shock as indicated.
- Manage airway as indicated
- Consider Zofran IV/IO for nausea associated with blood ingestion. Avoid PO administration.
- Consider analgesia.
- Consider mild sedation due to risk of increased bleeding from anxiety associate hypertension.
- If bleeding unresolved via direct pressure consider nasal packing.
- Prepare mixture of:
- 1ml Epinephrine 1:1000
- 1ml Lidocaine HCl 2%
- For patients with Cardiovascular disease or uncontrolled hypertension:
- Apply TXA as needed to soft rolled gauze or a commercial nasal packing device till wet.
- Begin packing affected nares.
- For all else:
- Administer 1ml of mixture to each affected nare via nasal atomizer. Using gauze to prevent leaking after administration.
- Begin packing affected nares either with moistened soft rolled gauze or a commercial nasal packing device.
- Administer 1ml of mixture to each affected nare via nasal atomizer. Using gauze to prevent leaking after administration.
- Consider IV/IO opioids for pain management. Avoid PO administration.
- Prepare mixture of:
Consider Differentials
- Facial Fractures
- Uncontrolled Hypertension
- Illicit drug use
- Bleeding Disorders
Navigate

References
Protocols
Medications
Procedures
Resources
Abuse / Neglect
This policy applies to: Patients who are suspected of being victims of abuse or neglect.
Exclusion Criteria: None
Recognize
- Injuries or burns in a pattern suggestive of intentional infliction.
- Injuries in various stages of healing or injuries scattered over multiple areas of the body.
- Patient, parent, or caregiver responding in an inappropriate manner to the situation.
- Malnutrition of extreme lack of cleanliness of the patient or environment.
- Infants: bulging of fontanels and altered mental status.
Evaluate
Administer Treatment
- Stabilize and treat injuries according to the appropriate protocol.
- Discourage patient from washing if sexual abuse is suspected.
- Document:
- All statements made by the patient, parent or caregiver.
- Any abnormal behavior on the part of the patient, parent or caregiver.
- The condition of the environment.
- Time and name of contact when reported to Adult Protective Services.
- Report all suspected cases of abuse / neglect to protective services. Do not initiate report in front of the patient, parent or caregiver.
Consider Differentials
- Not applicable
Navigate
References
Protocols
Medications
Procedures
Resources
Adult Protective Services phone: 1-800-252-5400
Adult Protective Services reporting website.
Adult Trauma
Procedures
Authorization Level
THIS REFERENCE APPLIES TO: The procedures and medications each EMT, AEMT/Advanced EMT or Paramedic in the AEMSS is authorized to initiate by the AEMSS Medical Director
| Procedure / Medication | Paramedic | Advanced EMT | EMT |
| Bag-Valve Mask | X | X | X |
| Bandaging | X | X | X |
| Blood Pressure | X | X | X |
| Bougie | X | X | X |
| Capillary Blood Glucose | X | X | X |
| Cardiopulmonary Resuscitation | X | X | X |
| Chest Seal | X | X | X |
| Combat Application Tourniquet | X | X | X |
| Continuous Positive Airway Pressure (CPAP) | X | X | X |
| Cricothyroidotomy | X | X | X |
| Endotracheal Intubation | X | X | X |
| Focused History & Physical Examination | X | X | X |
| Focal Neurological Deficit Exam | X | X | X |
| Foreign Body Airway Obstruction – Direct Laryngoscopy | X | X | X |
| Foreign Body Airway Obstruction – Manual Removal | X | X | X |
| Helmet Removal | X | X | X |
| Hemostatic Gauze | X | X | X |
| Intraosseous Access | X | X | |
| Israeli Bandage | X | X | X |
| IV Access | X | X | |
| Kendrick Extrication Device (KED) | X | X | X |
| Initial Patient Assessment | X | X | X |
| Initial History and Examination | X | X | X |
| Medical History | X | X | X |
| Neurological Exam | X | X | X |
| Physical Exam | X | X | X |
| Physical Exam | X | X | X |
| Respiratory Exam | X | X | X |
| Speech Exam | X | X | X |
| Vital Signs | X | X | X |
| Logroll | X | X | X |
| Medication Administration Cross Check | X | X | X |
| Nasopharyngeal Airway (NPA) | X | X | X |
| Needle Thoracostomy | X | ||
| Oropharyngeal Airway (OPA) | X | X | X |
| Oxygen Administration | X | X | X |
| PediaTape | X | X | X |
| Positive End-Expiratory Pressure (PEEP) | X | X | X |
| Pulse Oximeter | X | X | X |
| RAD-57 | X | X | X |
| Restraint of Violent Patient | X | X | X |
| Semi-Automatic External Defibrillation | X | X | X |
| SpCO/SpMet monitoring | X | X | X |
| Splinting | X | X | X |
| Supraglottic Airway Device | X | X | X |
| Synchronized Cardioversion | X | ||
| Traction Splinting | X | X | X |
| Transcutaneous Pacing | X | ||
| Treatment of Tasered Patient | X | X | X |
| Vagal Maneuvers | X | ||
| Video Laryngoscope | X | X | |
| Capnometry Capnography | X | X | X |
| Drug Administration: 2-Pam CL (Pralidoxime Chloride) | X | X2 | X2 |
| Acetylsalicylic Acid (Aspirin) | X | X | X |
| Adenosine (Adenocard) | X | ||
| Albuterol (Proventil, Ventolin) | X | X | X |
| Amiodarone (Cordarone) | X | ||
| Atropine Sulfate | X | X2 | X2 |
| Calcium Chloride | X | ||
| Cyanokit | X | X | |
| Dextrose (D25) | X | X | |
| Dextrose (D10) | X | X | |
| Dextrose (D50) | X | X | |
| Diphenhydramine (Benadryl) | X | X | X |
| Epinephrine 1:1,000 | X | X | X |
| Push Dose Pressor | X | ||
| Croup/Stridor | X | ||
| Epinephrine 1:10,000 | X | First 3 doses | |
| Fentanyl Citrate (Fentanyl) | X | ||
| Glucagon Hydrochloride | X | X | X6 |
| Glucose (Glutose) | X | X | X |
| Ipratropium (Atrovent) | X | X | X |
| Labetalol | X | ||
| Lidocaine (Xylocaine) | X | ||
| Magnesium Sulfate | X | ||
| Methylprednisolone (Solu-Medrol) | X | ||
| Midazolam (Versed) | X | ||
| Morphine Sulfate | X | ||
| Naloxone (Narcan) | X | X | X |
| Nitroglycerin (Nitrostat) | X | X | X4 |
| Ondansetron (Zofran) | X | X | X |
| Sodium Bicarbonate | X5 | X | |
| Terbutaline | X | ||
| Tranexamic Acid (TXA) | X |
Automatic Implantable Cardiac Defibrillator
Applies to: The treatment of patients with an implantable cardiac defibrillator (AICD).
Exclusion Criteria: None
Authorization: All Levels
Guidelines:
When caring for a patient with an implantable cardiac defibrillator (ICD), rescuers should know:
- If the ICD discharges while the rescuer is touching the victim, the rescuer may feel the shock, but it will not be dangerous. Personnel shocked by ICDs report sensations similar to contact with an electrical outlet.
- Apply ECG monitoring, SAED or hands-free defibrillation electrodes in the standard fashion at least one inch away from the ICD. Otherwise, treat the patient as any other requiring emergency care.
- ICDs are protected against damage from conventional transthoracic defibrillator shocks, but they require a readiness check after external defibrillation occurs.
- If a lethal ventricular dysrhythmia occurs in a patient with an ICD, the ICD has probably failed. Immediately defibrillate the patient. After an initial series of defibrillations, the ICD will likely become operative again only after a period of nonfibrillatory rhythm occurs to reset the unit.
- ICD units generally use patch electrodes that cover a portion of the epicardial surface. These may reduce transcardiac current from externally delivered transthoracic shocks.
-
- If external shocks of 200J fail to defibrillate an ICD patient, the Quik-Combo pads should immediately be changed to the anterior/posterior position (described in the Defibrillation LifePak 15 and Semi-Automatic External Defibrillation procedures) and the transthoracic shocks repeated.
- The different electrode positions may increase transcardiac current flow and facilitate defibrillation.
-
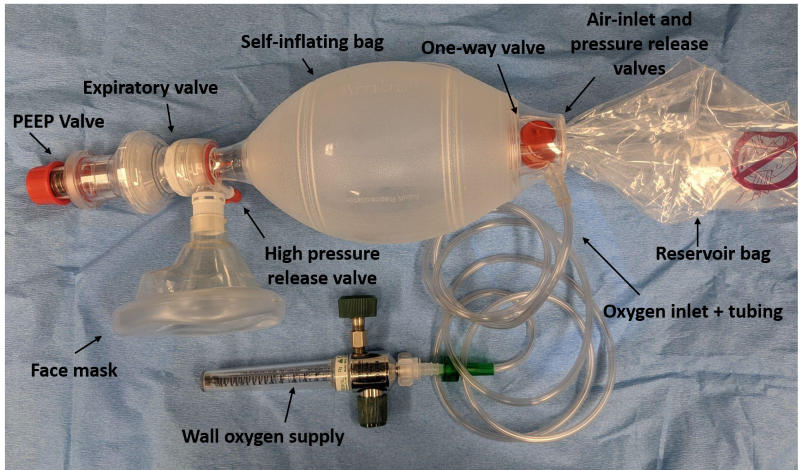
Bag-Valve Mask
THIS PROCEDURE APPLIES TO: Any patient unable to adequately ventilate him/herself who needs supplemental oxygen delivered via a bag-valve mask.
EXCLUSION CRITERIA: None
PROCEDURE
- Observe body substance isolation precautions.
- Rescuer 1 should position him/herself at the top of the victim’s head. Rescuer 2 should kneel at the patient’s side.
- Open the patient’s airway and maintain it with an oropharyngeal airway.
- Because bag-valve masks are most effective when used by at least two rescuers working together, when two rescuers are available the bag-valve mask will be a two-person skill.
- When two persons use the bag-valve mask:
- Rescuer 1, using both hands, positions the mask to maintain a seal around the nose and mouth.
- Rescuer 2 squeezes the bag with both hands, delivering each breath over 2 seconds.
- Apply cricoid pressure throughout the entire procedure or until the patient is successfully intubated.
- If only one rescuer is available:
- With one hand, apply the mask to the patient’s face.
- Grip the mandible with the last two or three fingers while gripping the mask with the remaining fingers.
- Maintain head tilt and jaw lift while maintaining a seal around the nose and mouth.
- Compress the bag with the other hand while observing the chest to ensure chest rise.
- Connect the bag-valve mask to an oxygen source.
Ventilating the Conscious Patient
- To avoid resistance or combativeness due to fear, explain the procedure to the patient.
- Begin by matching the volume and rate of the patient’s ineffective breathing. Adjust the rate and volume until you are ventilating at the necessary rate and volume.
Ventilating During CPR
- Administer each ventilation over one second, regardless of the patient’s size or age.
- Each ventilation should be of sufficient volume to make the patient’s chest rise.
- Ventilations administered during CPR increase pressure in the chest. This pressure reduces the amount of blood that refills the heart and in turn reduces the blood flow generated by the next set of chest compressions. For these reasons, ventilating too frequently or with too large a volume (hyperventilating) may be harmful because it may reduce blood flow generated by chest compressions.
Positive End-Expiratory Pressure (PEEP)
THIS PROCEDURE APPLIES TO: Patients for whom adequate oxygenation cannot be achieved by ventilations with a bag-valve mask alone due to alveolar collapse, decreased lung compliance, pulmonary edema, near drowning, cardiac arrest or other condition causing poor oxygen transfer in the alveoli.
EXCLUSION CRITERIA: Pneumothorax
PROCEDURE
- Attach PEEP valve to the bag-valve mask.

- Begin ventilating the patient with PEEP set at 5 – 10 cm H20.
- Increase or decrease PEEP in increments of 2 – 3 cm H20. Usually, PEEP settings of 5 – 10 cm H20 are adequate. The goal of titration is to achieve the level of PEEP associated with maximal oxygenation while avoiding adverse effects induced by PEEP.
- After each adjustment of PEEP, assess the effects on oxygenation by considering such things as waveform capnography, pulse oximeter measurements, the patient’s use of accessory muscles to breathe, skin color and moisture, changes in heart rate, blood pressure and sensorium.
- Watch for development of pneumothorax and decreased cardiac output caused by increased pressure in the airways.
Pulse Oximetry
THIS PROCEDURE APPLIES TO: Using a pulse oximeter to determine:
- Blood oxygen saturation.
- Carboxyhemoglobin concentrations for patients who may have inhaled smoke from a fire in a closed space and/or carbon monoxide.
- Methemoglobin concentration.
EXCLUSION CRITERIA: Do not use in the presence of flammable anesthetics, magnetic resonance imaging (MRI) equipment, or computed tomograph (CT) equipment. MAY NOT BE RELIABLE IN CARDIAC ARREST.
GUIDELINES
- Two general types of pulse oximeter sensors are carried on Arlington ambulances:
- Sensors that measure only blood oxygen saturation (non-disposable and disposable).
- A combination probe that measures blood oxygen saturation, carboxyhemoglobin (SpCO), and methemoglobin (SpMet) concentrations.
- The combination sensor should be used on patients who may have inhaled smoke or carbon monoxide. Use a sensor that measures only SpO2 for other patients.
- The combination SpCO/SpMet sensor will measure and continuously monitor:
- Carboxyhemoglobin concentration (SpCO): A percent value indicating the level of carbon monoxide bound to hemoglobin. Normal values are typically less than 9%. The LifePak 15 measures and displays SpCO levels from 0 - 40%.
- Methemoglobin concentration (SpMet): A percent value indicating methemoglobin, which impedes oxygen delivery. Normal values are typically less than 2%. Higher values assist in identifying methemoglobinemia. The LifePak 15 measures and displays SpMet levels from 0 - 15%.
- Oxygen saturation (SpO2): A percent value for oxygen saturation of hemoglobin. Normal values are typically 95% to 100%. The LifePak 15 measures and displays SpO2 levels from 50 - 100%.
- The combination SpCO/SpMet sensor looks similar to the non-disposable sensor that measures only SpO2. However, the end of the cable that connects the combination sensor to the LifePak 15 is labeled rainbow and specifies the three measurements, SpCO, SpMet and SpO2, it provides.
Special Considerations
- Patients exposed to carbon monoxide may not exhibit symptoms, so assess all patients with known or suspected exposure.
- Dyes such as Cyanokit may cause erroneous readings. Pulse oximetry cannot determine accurate SpCO% or SpO2% during or after Cyanokit administration.
- Refer to Poisoning: Carbon Monoxide & Hydrogen Cyanide Combined Medical Control section for assessment parameters.
- Refer to RAD-57 Monitor for considerations of carbon monoxide exposure in smokers, pregnant women, and multiple patient incidents.
PROCEDURE
- Observe body substance isolation precautions.
- Choose a well-perfused, warm, and dry site for sensor application. The preferred site is the ring finger of the non-dominant hand. For SpO2 monitoring, a toe may be used, but a finger is preferable.
- Remove fingernail polish or false nails to avoid inaccurate readings, or use an alternate site.
- Turn on the LifePak 15 if it is not already on. It performs a self-test for approximately 20 seconds before displaying readings.
- Select the appropriate sensor:
- For SpO2 monitoring only, use the non-disposable or disposable SpO2 sensor.
- For SpCO monitoring, use the SpCO/SpMet sensor.
- Choose the monitoring site, avoiding the same extremity as a blood pressure cuff:
- For patients who fit the non-disposable SpO2 or SpCO/SpMet sensor:
- The preferred site is the ring finger of the non-dominant hand. Alternatively, use the great toe.
- Ensure the fleshy part covers the detector completely. Do not use tape to hold the sensor in place.
- For patients too small for non-disposable sensors, use a disposable SpO2 sensor and wrap it securely but not too tightly.
- For patients who fit the non-disposable SpO2 or SpCO/SpMet sensor:
- Cover the sensor with opaque material if exposed to bright ambient light.
- Document the percent of oxygen saturation every time vital signs are recorded.
Patient Monitoring
When the combination SpCO/SpMet sensor is placed on the patient’s finger and connected to the LifePak 15, it defaults to monitoring SpO2 percent. The SpO2 reading appears on the left side of the screen with a matching waveform color.
To Quickly Obtain SpCO or SpMet Values
- Press PRINT on the LifePak 15 to display the values at the top of the printout. If dashes appear instead of values, allow a few more seconds for measurements.
To Display SpCO or SpMet Values
- Verify the combination SpCO/SpMet sensor is in use.
- Use the LifePak 15 SPEED DIAL to select the SpO2 area on the HOME screen.
- Select PARAMETER from the menu, then choose SPCO or SPMET.
- The selected value will display for 10 seconds before returning to the default SpO2 reading.
- The sensor measures SpCO in the range of 0 - 40% and SpMet in the range of 0 - 15%.
Documentation
If the combination sensor is used, the measurements (SpO2, SpCO, SpMet) will be recorded on the LifePak 15 code summary.
Capnography
THIS PROCEDURE APPLIES TO: All patients who have undergone advanced airway management, including endotracheal intubation or placement of a supraglottic airway, those receiving supplemental oxygen, or who have received sedation, antipsychotic medication, or narcotic pain management. This procedure also applies whenever directed by protocol.
EXCLUSION CRITERIA: None
PROCEDURE
Waveform Capnography is required for:
- Non-intubated patients with a chief complaint potentially affected by a metabolic or respiratory condition. If oxygen is required via a nonrebreather mask or CPAP, first apply an EtCO2 nasal cannula, then place the nonrebreather mask over the nasal cannula. If a nonrebreather mask is not necessary, use only the EtCO2 nasal cannula.
- All intubated patients:
- Immediately after intubation or placement of a supraglottic airway, and before administering the first ventilation, attach the EtCO2 sensor between the endotracheal (ET) tube and the bag-valve mask (BVM).
- Monitor the first ventilation with capnography and auscultate the epigastrium using a stethoscope.
- Target capnography levels are:
- 35 – 45 mmHg for a perfusing patient,
- 10 – 15 mmHg for a non-perfusing patient, and
- 35 – 40 mmHg for a patient with a closed head injury.
Number Interpretation
- EtCO2 levels less than 35 mmHg may indicate:
- Hyperventilation
- Decreased metabolic rate
- Hypoperfusion
- Airway obstruction
- Air trapping
- Impending cardiac arrest
- EtCO2 levels greater than 45 mmHg may indicate: (Note: Patients with chronic lung disease, such as COPD, may normally have higher readings)
- Hypoventilation
- Increased metabolic rate
- Hypertension
- Return of spontaneous circulation post-cardiac arrest
- Acidosis
- EtCO2 measurements during resuscitation are strong indicators of survivability. An EtCO2 level of 10 mmHg or lower, 20 minutes after the start of Advanced Cardiac Life Support (ACLS), is a predictor of poor outcome in patients with electrical activity but no pulse who have not received Sodium Bicarbonate. If the EtCO2 remains ≤ 10 mmHg after 20 minutes of quality compressions without hyperventilation, consider terminating resuscitation efforts.
Waveform Interpretation
- The normal capnography waveform has a square shape.
- A waveform of normal shape but low amplitude suggests reduced blood flow. This may occur in cases of shock, tension pneumothorax, pulmonary embolism, or pericardial tamponade. Low amplitude may also indicate hyperventilation, though the wave duration is typically shorter in hyperventilation compared to low blood flow.
- A rapid and steady decrease in waveform amplitude suggests declining pulse perfusion and impending cardiac arrest. A sudden return to normal amplitude may indicate a return of pulse or improved perfusion.
- A "stair-stepping" pattern, where each successive wave is higher or lower than the previous one, indicates CO2 retention due to inadequate exhalation time between breaths. Identify and address potential causes for this pattern if possible.
- Failure to produce a recognizable waveform immediately after intubation, or a sudden cessation of waveforms, may indicate apnea or a dislodged or obstructed ET tube. In these cases, replace the ET tube.
Documentation
As indicated above, document at least three EtCO2 measurements for each patient (press print three separate times). At a minimum, include measurements taken after initial intubation, during every patient move, and upon transferring care to another provider. The format for documentation may be written as: EtCO2=XX.
RAD-57
THIS POLICY APPLIES TO: Patients suspected of having carbon monoxide and cyanide poisoning.
EXCLUSION CRITERIA: Patients without a finger on which either the adult or pediatric sensor can be securely placed. Generally, the pediatric sensor will not fit patients weighing less than 10 kg.
AUTHORIZATION: All levels
GUIDELINES
In the AEMS System, this device is used to monitor arterial blood in patients who may have inhaled carbon monoxide and/or smoke from a fire in a closed space to determine:
- Oxygen saturation of hemoglobin (SpO2), and
- Carbon monoxide saturation (carboxyhemoglobin, SpCO)
SpO2 is the percent value of arterial oxygen saturation, while SpCO is the percent value indicating the level of carbon monoxide bound to hemoglobin. The RAD-57 is a handheld oximeter carried on all aerial apparatus, used for blood monitoring. If high levels of carbon monoxide are present, pulse oximeters like the LifePak 15 or Nonin capnometer may produce inaccurate results. For patients with potential carbon monoxide poisoning, use the RAD-57 to determine %SpO2 and %SpCO levels.
The RAD-57 can be used continuously on a single patient or to spot-check multiple patients. The %SpCO reading, alongside clinical signs and symptoms, assists in treatment decisions. Definitive measurements should be obtained via laboratory blood tests.
Documentation
Record the initial %SpCO and the time it was measured in the Patient Care Report, as well as any changes in %SpCO and their respective times. If there are no changes in %SpCO, document this along with the start and end times of monitoring. During mass casualty incidents (MCIs), record the %SpCO and the time on the triage tag.
Special Considerations
- Carboxyhemoglobin levels may not correlate well with symptoms of carbon monoxide poisoning and do not predict patient outcomes. Assess all patients with known or suspected exposure, even if asymptomatic.
- SpO2 values less than 90% can interfere with SpCO readings and may prevent a reading from being displayed.
- Dyes that alter blood pigmentation, such as Cyanokit, can cause erroneous readings. During and after Cyanokit administration, the RAD-57 should not be used to determine %SpCO.
Special Considerations for Specific Populations
Smokers: Cigarette smoke produces carbon monoxide, and heavy smokers may have a baseline carboxyhemoglobin level up to 10%. Smokers may be more susceptible to toxic effects from accidental exposure to carbon monoxide. Consider smoking history along with elevated Rad-57 readings, symptoms, and possible exposure.
Pregnant Women: The fetus is at higher risk from carbon monoxide exposure, with fetal %SpCO potentially 10% to 15% higher than the mother’s level. Transport all pregnant women with potential carbon monoxide exposure to a hospital, even if they show no symptoms.
Multiple Patient Incidents: The RAD-57 is useful as an early screening tool for multiple patients, such as firefighters in rehabilitation areas or civilians exposed to carbon monoxide. Use %SpCO readings to assess exposure, prioritize transport, and determine hospital destinations. When using the RAD-57 to check multiple patients with a reusable sensor, ensure the sensor clip is closed for at least five seconds between uses to reset monitoring.
OPERATION
Sensor Placement
- Place the sensor on a warm, clean, and dry finger with good perfusion. The fourth finger of the non-dominant hand is preferred. If unavailable, use the third or second finger. Avoid callused fingers if possible. Do not place the sensor on the same limb as a blood pressure cuff or across a child’s hand or foot. Remove nail polish containing metallic flakes.
- Before turning on the RAD-57, insert the finger into the sensor with the cable attachment on top. Ensure the fingertip reaches the stop block so the red light passes through the midnail. The fit should be secure.
- Strong sunlight or strobe lights may interfere with readings. If this occurs, use the provided light shield or cover the sensor.
- Confirm abnormal readings by testing different fingers.
Powering Up
- Press the power button to turn on the device; press and hold to turn it off.
- The device takes up to 25 seconds to fully start up, during which all LEDs will light up, and a tone will sound. Do not move the sensor during startup.
Patient Monitoring
After startup, the RAD-57 defaults to monitor oxygen saturation (SpO2), displaying the percent value for arterial oxygen saturation and the pulse rate. To obtain the carboxyhemoglobin (%SpCO) reading, press the DISPLAY button once. The reading will appear as a number, and CO will be shown on the lower display.
To Confirm High %SpCO Readings
- If the %SpCO reading is high, take additional readings on two other fingers.
- If the readings are within ±3%, use the average as the %SpCO value. If they differ by more than 3%, check the sensor placement and repeat the reading.
Additional Controls
- The SIQ bar graph indicates signal quality. Green bars indicate good quality, yellow bars indicate moderate quality, and red bars indicate poor quality.
- To cycle through readings (SpO2, SpCO, Perfusion Index), press the DISPLAY button repeatedly.
- The Perfusion Index measures blood flow quality, with a desired value greater than 1.00%.
Items of Note
- If the heart rate exceeds 180 beats per minute, the alarm will sound, and the device will not display %SpCO.
- If venous pressure exceeds arterial pressure (e.g., after extreme physical exertion), the display will show dashes until the patient rests and venous pressure normalizes.
Vascular Access
THIS POLICY APPLIES TO: Any patient where intravenous (IV) or intraosseous (IO) access is indicated, such as significant trauma, emergent or potentially emergent medical conditions. Recommended for all critical care patients.
RECOGNIZE:
- IV access indicated in cases of significant trauma or emergent medical conditions.
- Access of an existing venous catheter for medication or fluid administration.
- Central venous access in critical patients.
- Patients requiring rapid IV access with:
- Multisystem trauma with severe hypovolemia
- Severe dehydration with vascular collapse and/or loss of consciousness
- Respiratory failure/arrest
EVALUATE:
- Conduct primary and secondary survey.
Administer Treatment
Vascular Access – Peripheral Extremity
- Don appropriate PPE.
- Use intraosseous (IO) access if life-threatening conditions exist prior to IV catheter placement attempt.
- Select the largest catheter bore based on patient condition and vein size.
- Inspect IV solution for expiration date, cloudiness, discoloration, leaks, or particles.
- Connect IV tubing in a sterile manner; fill drip chamber and flush tubing to remove air bubbles.
- Place tourniquet, select vein, and choose appropriate gauge catheter.
- Prep skin with antiseptic solution, insert needle with bevel up, and advance catheter into vein.
- Remove tourniquet, connect IV tubing or saline lock, and ensure free fluid flow.
- Secure site with sterile dressing and document procedure.
Vascular Access – External Jugular
- Don appropriate PPE.
- Place patient supine with head turned to opposite side (if no cervical injury risk).
- Prep site with antiseptic, align catheter with vein toward same-side shoulder.
- Puncture vein between jaw angle and clavicle; attach IV and secure without circumferential dressing.
- Document procedure, time, and outcome.
Vascular Access – Intraosseous
- Don appropriate PPE.
- Identify insertion site (humeral head, proximal tibia, distal tibia, or distal femur based on patient age and size).
- Prep site with antiseptic solution.
- Insert IO needle at a 60-90 degree angle using manual or EZ-IO device until loss of resistance is felt.
- Remove stylet, aspirate bone marrow if using manual device, and flush with 5 ml NS to confirm placement.
- Administer 0.5 mg/kg Lidocaine (max 40 mg) for pain relief if patient > 3 kg, and flush with 10 ml NS.
- Stabilize and secure needle, adjust flow rate, and document procedure.
Vascular Access – Existing Catheters
- Don appropriate PPE and clean catheter port with alcohol wipe.
- Withdraw 5-10 ml of blood and discard; flush port gently with 5 ml NS.
- Ensure no resistance, infiltration, or patient discomfort before proceeding with medication or fluid administration.
- Document procedure, any complications, and fluids/medications administered.
Vascular Access – Port-A-Cath
- Don appropriate PPE and clean access site with antiseptic.
- Stabilize port chamber and insert Huber needle using sterile technique.
- Withdraw 10 ml for waste, then flush with 10 ml NS.
- If no resistance or infiltration, proceed with administration; otherwise, stop and reassess.
- Secure Huber needle and document procedure.
CONTRAINDICATIONS:
- Peripheral Access: Avoid foot access in diabetics and access on the same side as a dialysis shunt.
- External Jugular Access: Contraindicated in patients ≤ 8 years of age.
- Intraosseous Access: Fracture at proposed site, Osteogenesis Imperfecta, infection at site, prior IO insertion or joint replacement at site.
- Existing Catheter Access: None specific, but assess for clots or dislodgement.
Transport Considerations
None
Information
External Jugular Vein Cannulation: Indicated for critically ill patients > 8 years needing IV access when peripheral or IO access is not feasible. Can be attempted first in life-threatening events where other access is not obtainable.
Other Populations
- EZ-IO contraindicated for patients < 3 kg; use manual IO for these patients.